How to Back Up My Pics to Google Drive Automatically Upload

Greg is a well-organized person. He likes to keep a backup for everything. This includes both his personal as well every bit professional piece of work. Simply on one of the occasions, he establish himself stuck. He saved some edited pictures in his Google drive on his laptop and left it at domicile. Afterwards in the day, when he needed it, he had not-edited pictures. The work was urgent simply could non be accomplished as planned.
This incident is a red signal for all of us. It reminds us of the importance of a fill-in of photos and other data across all the devices. Then what is the best fashion to backup photos to Google Drive? It's none other than Fill-in and SYNC. Now, yous might be interested in learning about the app and too the demand for this. Google Backup and Sync is a safe and simple backup service for your photos and videos to the Google Photos Library. You are the sole possessor unless you share them with somebody else. As well, syncing ensures saving whatever change made after storing to become reflected on all the devices synced. This means that if you edit and save a picture on your smartphone, it will appear the same on photos.google.com. Not simply photos and videos, it can relieve non-Google files besides. The added benefit is that yous can choose backing upward particular folders to the deject continuously.
- Role 1. How to Fill-in Photos to Google Bulldoze
- Part 2. Fix "Google Bulldoze Doesn't Sync All Files"
- Role 3. How to Backup Pictures to Google Drive Automatically
Part i. How to Backup Photos to Google Drive
- Login to your Google account
- On the right-mitt side, click on the "Google apps" carte
- Click on "Drive". Information technology opens up in a new tab
- On the left-manus side, right-click on the "New" bar and then click "Folder"
- A window will appear. Cull the binder you wish to upload and click
- After uploading, click on the settings carte
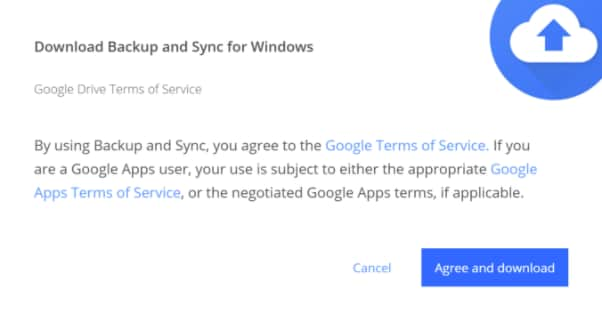
- Click on "Get Fill-in and Sync for Windows".
- In a new tab, click "Hold and Download" and brainstorm the download
- Subsequently the file gets downloaded, double click to brainstorm the installation. Google Chrome users can see the downloaded file at the bottom left corner of the browser.
- When Backup and sync ends downloading files, it gets installed. You lot will receive the notification post-installation.
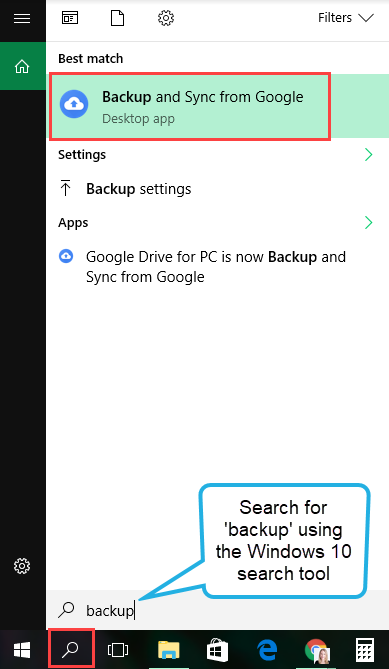
- Backup and sync app opens automatically. If it doesn't open, look for it using the search office in Windows 10.
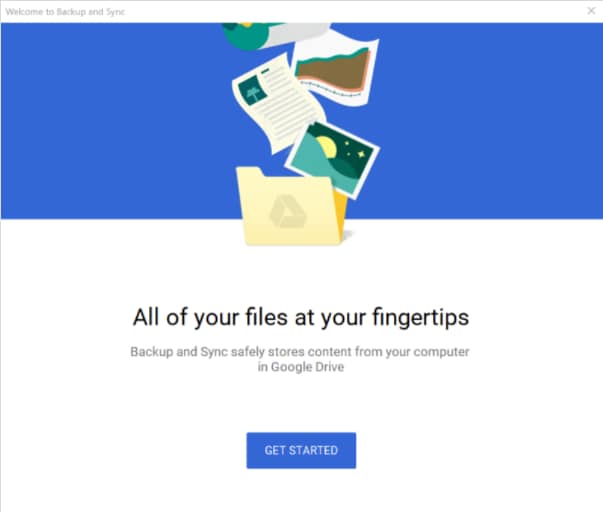
- Click on "Get Started" and start-upwards Backup and Sync.
- Choose what to do with the folders - a continuous backup for photos and videos to your Google drive.
- In the next window, "Documents", "Desktop" and "Pictures" are already ticked. Untick the i you practise non want to backup.
- You can ever choose backup other folders by clicking the folder link.
- Check the storage space in the Google account. Ensure ample backup space for photos and videos.
- Cull the upload size (high quality or original quality) of the videos photos for backup. And is or not you want to upload them to the Google photos.
- Click "Next" for finishing configuring fill-in settings.
- Click "Got it" on the aid screen
- You tin choose to synchronize either everything or all the photos.
- Click "Start" to complete the configuration.
Function two. Fix "Google Drive Doesn't Sync All Files"
Indeed, Google drive is an extremely useful tool, but information technology fails to deliver on some occasions, particularly when it comes to providing fill-in for pictures and videos. Allow's find out.
These include the post-obit:
- Not sync all photos
- Tin't sync photos from NAS
- Can't sync only changed or new photos
These are indeed annoying! Fixes to the above issues include the following solutions.
- Solution one - Refresh Google Drive
Refresh drive. Alternatively, yous can too pause and resume the sync task. This is especially useful when Google backup is stuck. Resume. This will rescan the source files and detect out what is missed out.
- Solution 2 - Restart Fill-in and Sync
Go out Google drive from its system tray icon on the bottom right taskbar. Now from the start carte du jour applications bar, open Google drive again. Information technology will expect for unsynced files and will sync missing files to fill-in photos and videos.
- Solution 3 - Change Google Drive sync settings
Make some changes to your Backup and Sync settings. This includes: cull what to sync to Google Drive, choose what to sync from Google Drive, Change the location of the Google Drive Folder, Sync USB devices, and SD cards and choose to not sync sure files.
- Solution iv - Cheque the network connection
Ofttimes, the network connection poses issues. A slow or interrupted connectedness makes syncing difficult. Ensure a smooth connection.
- Solution 5 - Reconnect Your Account
If the error reads 'Google bulldoze folder missing'. Disconnect the business relationship and so reconnect again by signing in once again.
- Solution 6 - Restart Your Computer
When you restart again, it volition have a few minutes for the backup and sync procedure to complete. Click on the start button at the bottom. Click 'Restart' and click over again to confirm 'Restart'.
- Solution vii - Manually Sync Files
If the automatic syncing poses problems, effort syncing the files manually.
- Solution 8 - Use AOMEI Backupper Professional
You lot can take advantage of AOMEI Backupper Professional to fix all the issues. Information technology is a reliable PC backup. Information technology duplicates and restores data on infinite computers within a visitor. It can likewise be used for billable technical services to customers with unlimited usage. And some of its features are as follows:
The Best Photo Backup Software for Windows

- Allows you lot to take automatic, total, incremental, and differential backups of system, disk, division, and files.
- Supports arrangement restore, disk restore, unlike hardware restore, partition restore, and selective file restore.
- Supports disk clone, partition/book clone, flexible clone, arrangement clone, and control line clone.
- Supports Windows 10, Windows 8.ane/eight, Windows seven, Vista, and XP (all editions, 32/64-bit)
Part 3. How to Fill-in Pictures to Google Drive Automatically
Earlier, Google backup and sync did non permit syncing photos and videos from network-attached storage (NAS) devices. But now it does. The new update v3.39 rolled out in February 2018 ensures that your drive stores pictures from NAS devices equally well. It carries some amazing fixes alongside. Here is how to go most it:
- Connect the network device to the PC.
- Open Backup and Sync. In the "My Figurer" department of the app, click "Choose Binder".
- Select the select folder of the subfolder. Click.
- Network folders sync when mounted to the computer.

How to Schedule the Automated Incremental Backup
But before proceeding, let usa but sympathize what incremental backup is.
Incremental fill-in is bankroll up of all the data changed on the terminal backup. During the incremental backup, all the marked files and folders would be backed upwards. The kickoff incremental backup is on the full fill-in. You can do this with AOMEI Backupper Professional. AOMEI allows scheduling the automatic incremental backup for pictures, videos, and files/folders. Here is how it is done:
Pace 1. Install AOMEI Backupper
Install the app. To carry out an incremental backup of photos, create a full backup first and click on "File Backup" under the Backup tab.

Step 2. Select files and location
Click "Add File" to cull the photos to exist backed up. So move on to "Pace 2", click on the greyness arrow icon and choose "Select a Cloud bulldoze". Choose Google Drive as a storage location.

Stride 3. First photo backup
Click "Start Backup". This creates a full backup of the selected photos.

Step 4. Schedule automated backup
Click on "Schedule" and locate the "General" interface. Choose your desired automatic backup date and time.

Step 5. Do incremental backup
Then you tin can click "Advanced", choose incremental backup, and click "OK" to initiate the backup mode.

Pace 6. Start photograph backup
Click "Start Backup". This creates a full backup of the selected photos.
Conclusion
Finally, if you lot use Google Bulldoze for PC, the whole process becomes extremely simple. All you lot need to exercise is to download, install, and configure Backup and Sync. The residual of the job would be washed past the tool effortlessly. At that place are other methods too which tin be employed for the purpose but AOMEI is recommended highly for its seamless capabilities. Information technology has been described in detail in this article. Promise it suffices your need to know how to fill-in photos to Google Drive. Please call up, the just downside of saving to Google drive it provides just xv GB of free infinite. For more than, yous are required to pay a pocket-size amount, just this is all worth it. It is the all-time manner to backup photos and videos.
Other pop Articles From Wondershare
Source: https://recoverit.wondershare.com/data-backup/best-way-to-backup-photos-to-google-drive.html
0 Response to "How to Back Up My Pics to Google Drive Automatically Upload"
إرسال تعليق